> ## Documentation Index
> Fetch the complete documentation index at: https://docs.doko-ai.com/llms.txt
> Use this file to discover all available pages before exploring further.

# Campaigns

> Advertise events and messages to your audience

## What are Doko campaigns?

Campaigns allow you to create and send promotional messages to specific groups of contacts using WhatsApp. With campaigns you can:

* **Segment your audience**: Choose specific contact lists for each campaign
* **Personalize messages**: Use templates with dynamic parameters to make each message unique
* **Schedule sends**: Decide when to send your messages, either immediately or at a future date
* **Track results**: View all your campaigns from your dashboard

<Tip>Campaigns are ideal for promotions, events, reminders, and personalized mass communications</Tip>

## Prerequisites

Before creating your first campaign, make sure you have:

1. **Contact lists created**: You need at least one contact list to send the campaign
2. **Active WhatsApp integration**: You must have the WhatsApp Business integration configured and active
3. **Meta-approved templates**: Message templates must be pre-approved by Meta for use

<Warning>Without an active WhatsApp integration, you will not be able to create or send campaigns</Warning>

## Create a campaign step by step

Follow these steps to create your first marketing campaign:

<Steps>
  <Step>
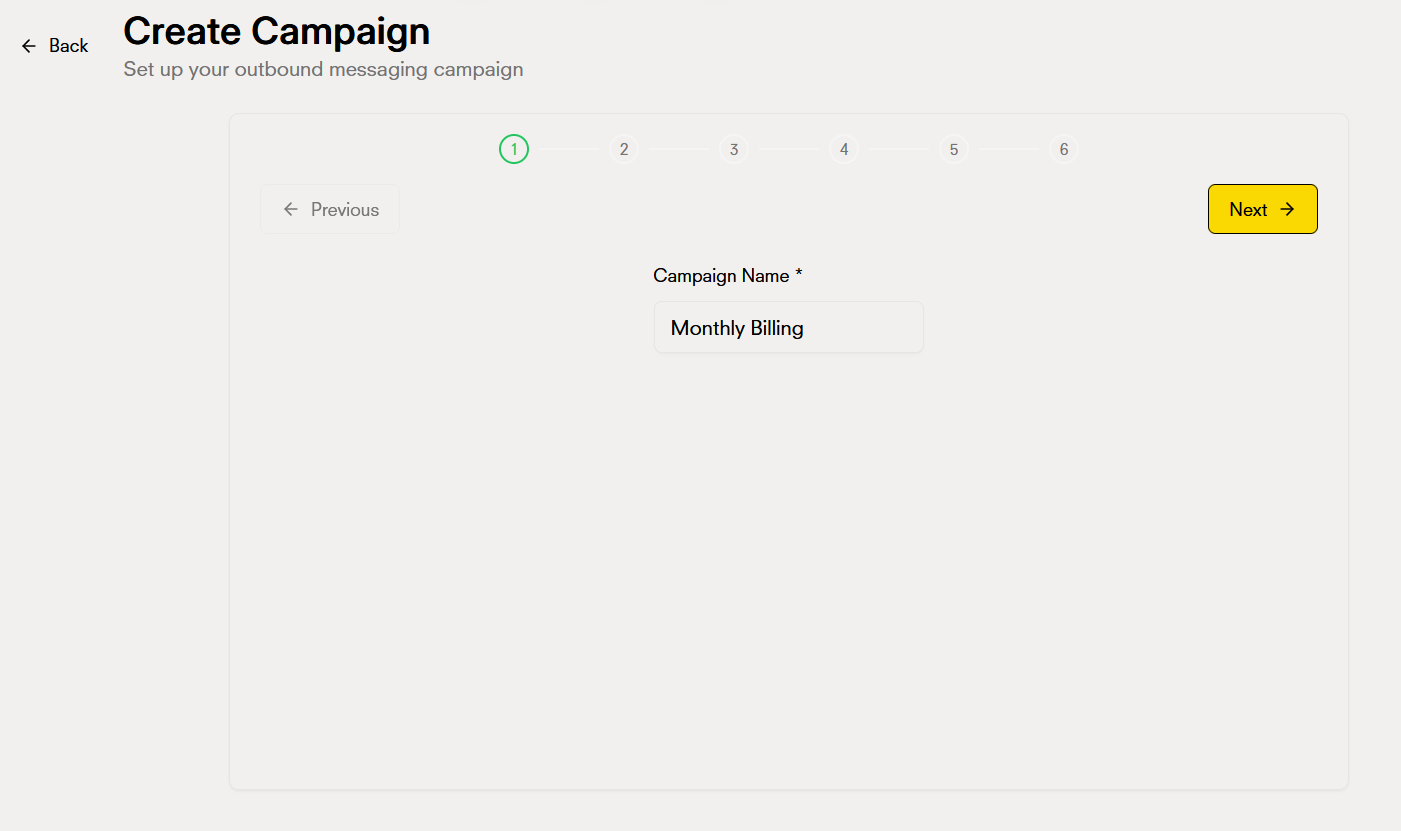
    <h3>1. Campaign name</h3>
    <p>The first thing is to give your campaign a descriptive name. This name will help you identify it easily in your dashboard.</p>

    <Frame>
      <img src="https://mintcdn.com/doko/B63ibqOGEufn9c4Y/images/campaigns/en/campaign1.png?fit=max&auto=format&n=B63ibqOGEufn9c4Y&q=85&s=5837217d86259906b54fbda583185442" alt="Campaign name" width="1401" height="831" data-path="images/campaigns/en/campaign1.png" />
    </Frame>

    <Tip>Use descriptive names like "Black Friday Promotion" or "March Event"</Tip>
  </Step>

  <Step>
    <h3>2. Select contact list</h3>
    <p>Choose the contact list you want to target with your campaign. Only contacts from the selected list will receive the messages.</p>

    <Frame>
      <img src="https://mintcdn.com/doko/B63ibqOGEufn9c4Y/images/campaigns/en/campaign2.png?fit=max&auto=format&n=B63ibqOGEufn9c4Y&q=85&s=be7915834d5f40a59ab45ab5374283eb" alt="Verify WhatsApp" width="1397" height="817" data-path="images/campaigns/en/campaign2.png" />
    </Frame>

    <p>You can see information about the selected list:</p>

    <ul>
      <li>Total number of contacts</li>
      <li>List creation date</li>
      <li>Last update</li>
    </ul>
  </Step>

  <Step>
    <h3>3. Verify WhatsApp integration</h3>
    <p>The system will automatically verify if you have an active WhatsApp integration. If it's not active, you'll see a warning and won't be able to continue.</p>

    <Warning>If your integration is not active, go to the Integrations section to configure it before continuing</Warning>
  </Step>

  <Step>
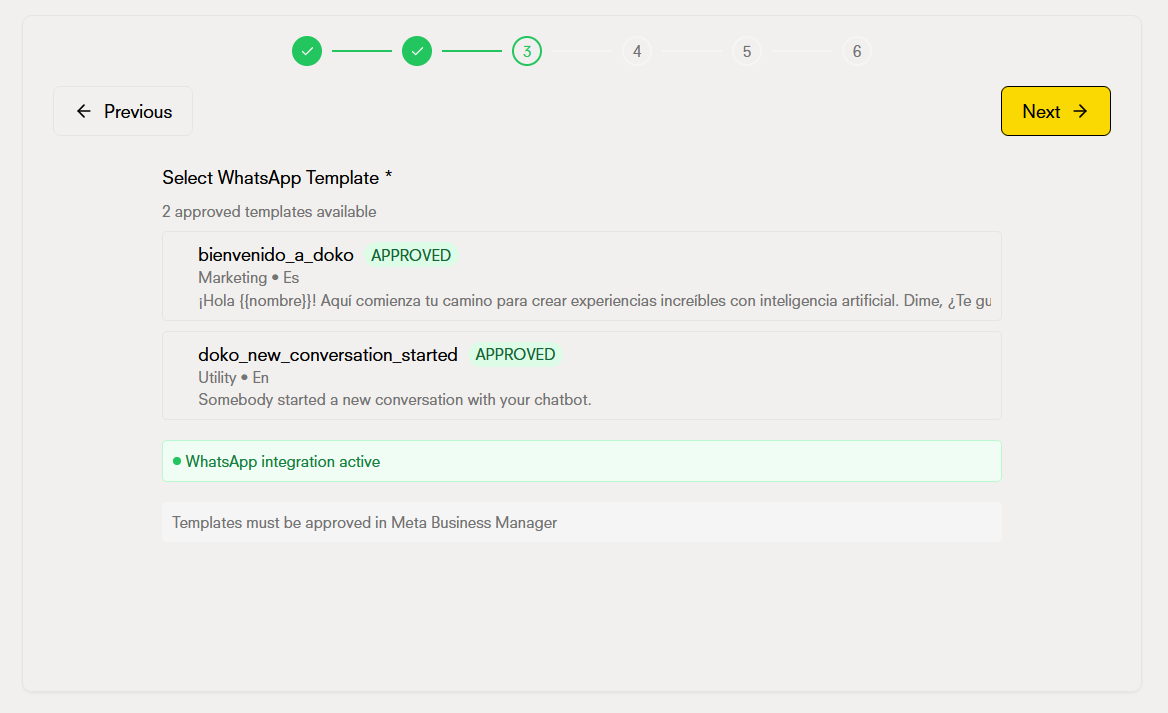
    <h3>4. Select WhatsApp template</h3>
    <p>Once the integration is verified, you'll be able to select a Meta pre-approved message template. You'll only see templates that are approved and available.</p>

    <Frame>
      <img src="https://mintcdn.com/doko/B63ibqOGEufn9c4Y/images/campaigns/en/campaign3.png?fit=max&auto=format&n=B63ibqOGEufn9c4Y&q=85&s=38583b77c8f34cf10d0ab670e7db7689" alt="Select template" width="1168" height="713" data-path="images/campaigns/en/campaign3.png" />
    </Frame>

    <p>Each template shows:</p>

    <ul>
      <li>Template name</li>
      <li>Approval status (approved by Meta)</li>
      <li>Message preview</li>
      <li>Available parameters</li>
    </ul>
  </Step>

  <Step>
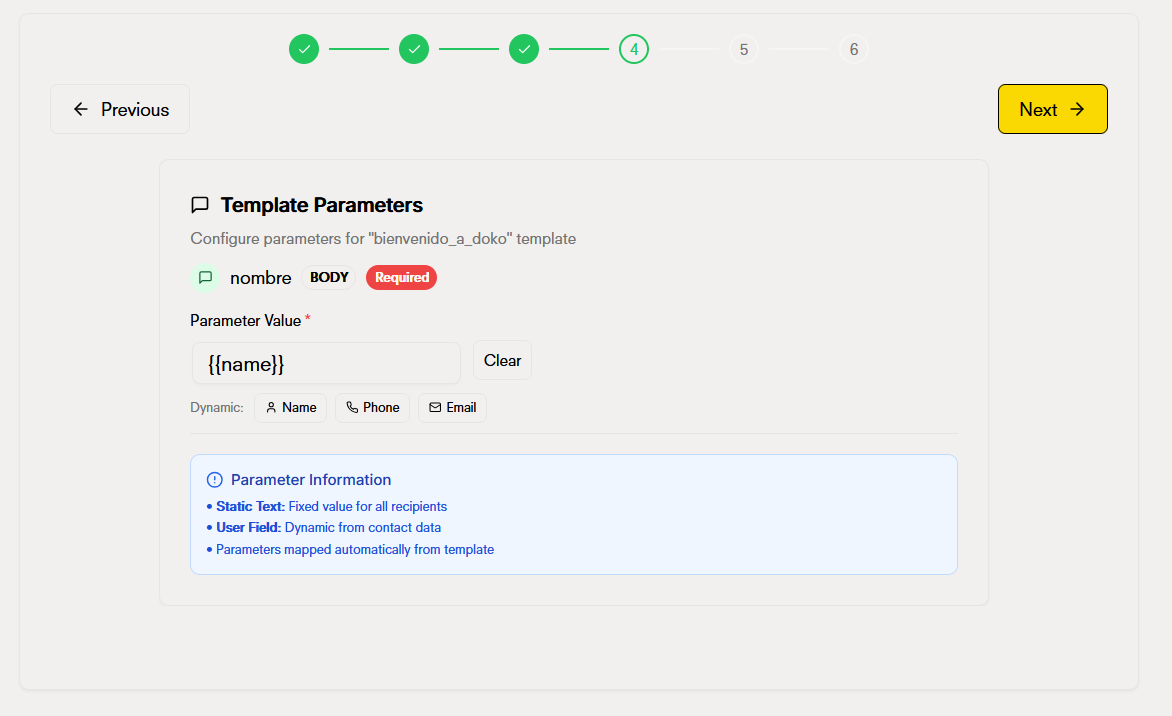
    <h3>5. Configure template parameters</h3>
    <p>If your template includes dynamic parameters like <code>{`{{name}}`}</code> or <code>{`{{phone}}`}</code>, you'll need to configure them in this section.</p>

    <Frame>
      <img src="https://mintcdn.com/doko/B63ibqOGEufn9c4Y/images/campaigns/en/campaign4.png?fit=max&auto=format&n=B63ibqOGEufn9c4Y&q=85&s=bdcfd48719b92c1f097904e5f0885ab0" alt="Configure parameters" width="1172" height="716" data-path="images/campaigns/en/campaign4.png" />
    </Frame>

    <p>Common parameters include:</p>

    <ul>
      <li><code>{`{{name}}`}</code>: Will be replaced with the contact's name</li>
      <li><code>{`{{phone}}`}</code>: Will be replaced with the contact's phone number</li>
      <li><code>{`{{email}}`}</code>: Will be replaced with the contact's email</li>
      <li>Custom parameters according to your template</li>
    </ul>

    <Tip>Parameters will be automatically replaced with each contact's data when sending the message</Tip>
  </Step>

  <Step>
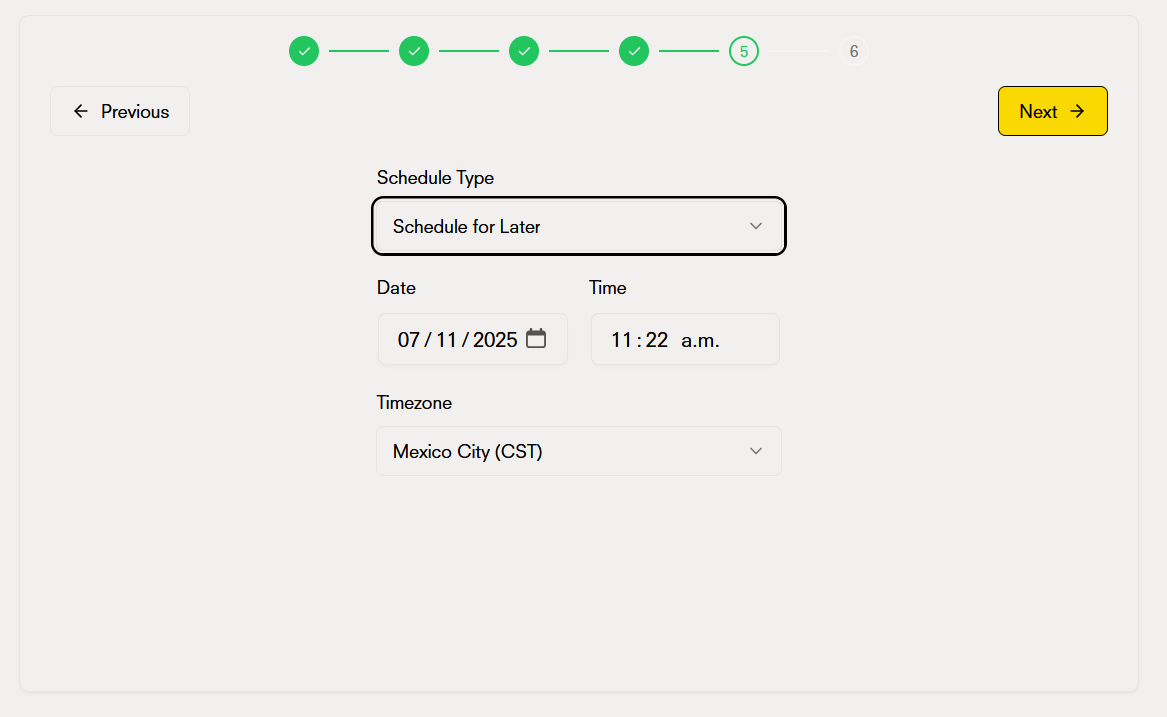
    <h3>6. Schedule the send</h3>
    <p>Choose when you want the campaign messages to be sent:</p>

    <Frame>
      <img src="https://mintcdn.com/doko/B63ibqOGEufn9c4Y/images/campaigns/en/campaign5.png?fit=max&auto=format&n=B63ibqOGEufn9c4Y&q=85&s=9275084ef30061369a5d6810d56cad4c" alt="Schedule send" width="1167" height="717" data-path="images/campaigns/en/campaign5.png" />
    </Frame>

    <h4>Option 1: Immediate send</h4>
    <p>Messages will be sent as soon as you create and confirm the campaign.</p>

    <h4>Option 2: Scheduled send</h4>
    <p>Schedule the exact date and time you want the messages to be sent. You can choose:</p>

    <ul>
      <li>Send date</li>
      <li>Send time (consider your contacts' time zone)</li>
    </ul>

    <Tip>Schedule your campaigns for times when your contacts are most active to improve open rates</Tip>
  </Step>

  <Step>
    <h3>7. Review campaign summary</h3>
    <p>Before confirming, review the complete summary of your campaign:</p>
    <p>The summary includes:</p>

    <ul>
      <li><strong>Campaign name</strong>: The name you gave it</li>
      <li><strong>Contact list</strong>: The selected list and number of contacts</li>
      <li><strong>Template</strong>: The WhatsApp template that will be used</li>
      <li><strong>Configured parameters</strong>: The values that will be used for the parameters</li>
      <li><strong>Schedule</strong>: Send date and time (or "Immediate")</li>
    </ul>

    <Frame>
      <img src="https://mintcdn.com/doko/B63ibqOGEufn9c4Y/images/campaigns/en/campaign7.png?fit=max&auto=format&n=B63ibqOGEufn9c4Y&q=85&s=05848dd58c775a34f37ea9af586f0174" alt="Campaign summary" width="913" height="683" data-path="images/campaigns/en/campaign7.png" />
    </Frame>
  </Step>

  <Step>
    <h3>8. Confirm and create the campaign</h3>
    <p>Once you've reviewed the summary, confirm the campaign creation.</p>
    <Warning><strong>Important:</strong> Each message sent will use one AI credit. Make sure you have enough credits available before confirming the campaign.</Warning>
  </Step>
</Steps>

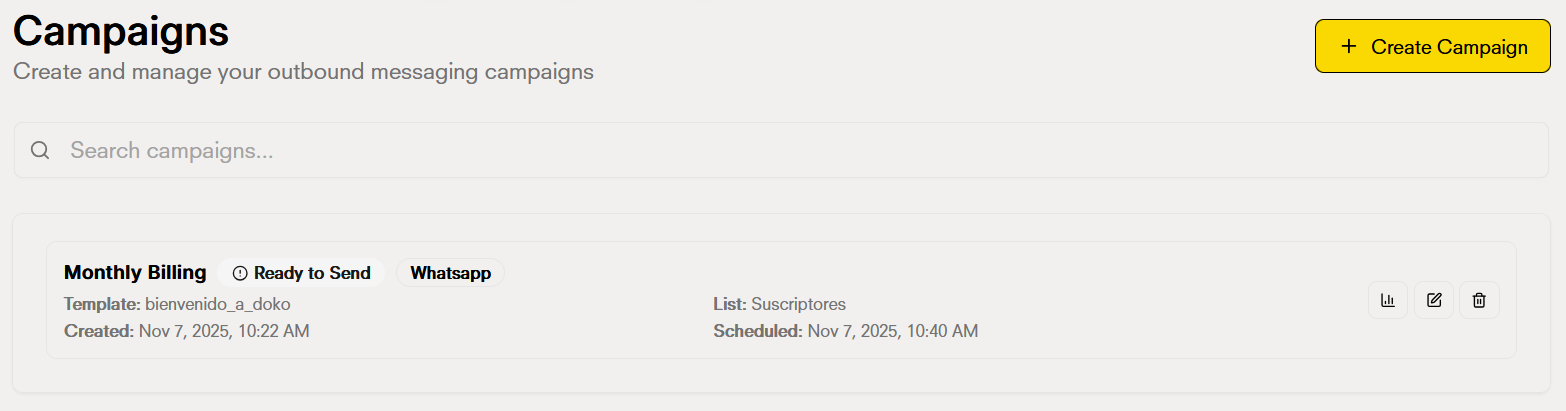
## Manage campaigns from the dashboard

Once created, all your campaigns will appear in the Campaigns section of your dashboard. From there you can:

<Frame>
  <img src="https://mintcdn.com/doko/B63ibqOGEufn9c4Y/images/campaigns/en/campaign8.png?fit=max&auto=format&n=B63ibqOGEufn9c4Y&q=85&s=dd078e0928355c370e2c24f6fc8aaed6" alt="Resumen de campaña" width="1566" height="411" data-path="images/campaigns/en/campaign8.png" />
</Frame>

<Card title="View all your campaigns" icon="list">
  Access a complete list of all your campaigns with information about their status, creation date, and results.
</Card>

<Card title="View campaign details" icon="eye">
  Click on any campaign to see detailed information such as number of messages sent, contacts reached, and delivery status.
</Card>

<Card title="Filter and search" icon="search">
  Use filters to find campaigns by status, date, contact list, or name.
</Card>

## Campaign states

Campaigns can have different states:

| State     | Description                                                             |
| --------- | ----------------------------------------------------------------------- |
| Scheduled | The campaign is created and waiting for the scheduled date/time         |
| Sending   | Messages are currently being sent                                       |
| Completed | All messages were sent successfully                                     |
| Paused    | The campaign was manually paused                                        |
| Error     | There was a problem during sending (check details for more information) |

<Accordion title="FAQ">
  ### Can I cancel a campaign after creating it?

  Yes, you can pause or cancel a campaign from the dashboard before it's sent. If sending has already started, you won't be able to cancel it, but you can pause it.

  ### What happens if I don't have enough AI credits?

  If you don't have enough credits, the campaign won't be sent. Make sure you have enough credits before creating the campaign.

  ### Can I edit a campaign after creating it?

  Depending on the campaign's state, you'll be able to edit certain aspects. Scheduled campaigns can be modified before sending.

  ### How do I know if a message was delivered?

  You can see the delivery status of each message in the campaign details in your dashboard.

  ### Can I use the same template in multiple campaigns?

  Yes, you can reuse approved templates in as many campaigns as you want.
</Accordion>